If I need to rearrange my fragmentation, I will for you….

Oh my goodness, I have been buried and learning tons about Indexing.  Something super cool that I learned was how to know if you need to adjust your fillfactors on your indexes.  My whole DBA career I have usually set it 85 and forgotten it. I learned that I can check my CommandLog and see how often that index is being rebuilt.   I am currently using Ola and when my indexes are rebuilt for maintenance (rebuilt nightly in this case), it is all logged to a table named CommandLog in the master database.  If an index is rebuilt everyday, adjust the fillfactor  down (75) so that it will rebuild less often.  If it nearly never rebuilds, adjust the fillfactor up (90) so it gets rebuilt once in a while and to avoid wasting space in an index. Here is the query I am using to see how often an index has rebuilt in the last 10 days.


SELECT Command, COUNT(StartTime) AS Rebuilt
FROM master.[dbo].[CommandLog]
WHERE CommandType LIKE '%Index%' AND StartTime > GETDATE()-10
GROUP BY Command
ORDER BY Rebuilt DESC

When I see ones that have a rebuilt number of 10, 9 or 8, I know those are rebuilding nearly everyday.  I will adjust their fillfactors down so that I don’t rebuild as often.  My sweet spot right now is once a week, but that doesn’t work for every index (or environment).  This is where the art part comes into the DBA world and I have to think about what is best for the system.  If I have already adjusted something down to 75 and it is still rebuilding frequently, I will adjust that number down more (65, then 55), and back up if it is too low.  I also evaluate how much that index is used and how important it is to keep healthy. If it is hardly ever used, do I want to waste fillfactor space?

Indexing is absolutely an art, but now I have a new brush for my kit by being able to query the CommandLog.

This post’s song is Particles by Nothing But Thieves

Dynamic Data Masking keeps playing…keep your hands off my data!

As promised, I have been playing with Dynamic Data Masking and here are some things I have learned.  I downloaded World Wide Importers so I would have a place to play and there were masked columns already included.

This query will show us what has already been masked:

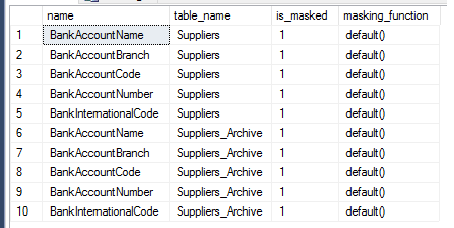
SELECT mc.name, t.name as table_name, mc.is_masked, mc.masking_function
FROM sys.masked_columns AS mc
JOIN sys.tables AS t
 ON mc.[object_id] = t.[object_id]
WHERE is_masked = 1;

Here we can see the column and the table that is being masked and what masking function is being used.

masking 1

This is a great time to talk about the different masking functions and what they do.  The four types in 2016 are Default, Email, Random and Custom String.

Default – For numeric and binary it will show a “0” For a date it will show 01/01/1900 and for strings it will show xxxx’s (more or less depending on the size of the field).

Email – It will expose the first letter of the email address and the suffix at the end of the email (.com, .net, .edu etc.) For example Batgirl@DC.com  would now be bxxx@xxxx.com.

Random – Number randomly generated between a set range. Kind of like the game, “Pick a number between 1 and 10” but for SQL.

Custom String – Lets you get creative with how much you show or cover and what you use to cover (not stuck with just xxxx’s).

Now for fun, let’s create a table that will be masked.

CREATE TABLE SuperHero
(HeroId INT IDENTITY PRIMARY KEY
,HeroName VARCHAR(100)
,RealName VARCHAR(100) MASKED WITH (FUNCTION = 'partial(1,"XXXXXXX",0)') NULL
,HeroEmail VARCHAR(100) MASKED WITH (FUNCTION = 'email()') NULL
,PhoneNumber VARCHAR(10) MASKED WITH (FUNCTION = 'default()') NULL);

Let’s add some data that we will want to mask:

INSERT SuperHero (HeroName, RealName, HeroEmail, PhoneNumber) VALUES
('Batman', 'Bruce Wayne', 'batsy@heros.com', '5558675309' ),
('Superman', 'Clark Kent', 'manofsteel@heros.com','5558675308' ),
('Spiderman', 'Peter Parker', 'spidey@heros.com','5558675307' );

SELECT * FROM SuperHero;

and finally we add some low level permissions of people who will look at the masked version of the data:

CREATE USER CommonPeople WITHOUT LOGIN; 
GRANT SELECT ON SuperHero TO CommonPeople; 

Now the test to see if CommonPeople have access to see all of our Superhero secrets:

EXECUTE AS USER = 'CommonPeople';
SELECT * FROM SuperHero; 
REVERT;

Try it out and see for yourself how it looks. Now you have experienced Dynamic Data Masking 101 in SQL Server 2016!

The song for this post is Good Charlotte – Keep Your Hands Off My Girl

All the Masking in the World Can Maybe Cover Your Dirty Laundry….

I have spent the last week learning about new features in SQL Server 2016 and one that I want to play with is Dynamic Data Masking (DDM).

What is data masking? It is a way to change or hide sensitive data. If I want to hide an email address that is Batgirl@DC.com,  I could either change it to be Batwoman@Heros.com using a masking software or I could use DDM to cover it like this BXXXXX@XXXXXX.com. I can also determine how many letters I want to cover with the masking in DDM.

If you want to permanently mask it for security purposes and force it to never link back to your production data, SQL Server Dynamic Data Masking (DDM) is not for you.  The built-in feature only applies a mask over the top, it doesn’t actually change the data that is stored in the database.   Think of SQL Servers’ version of data masking like a Halloween mask that sits on your face as opposed to plastic surgery that will forever change the way you look.

SQL Servers’ DDM will mask data to users that you set up to see the mask.  This is helpful for reporting or for curious people who want to look at data they shouldn’t be viewing.  It will not hide the data from privileged users.  It will not protect your data from someone taking a backup and restoring it somewhere else (If you want that, try Alway Encrypted instead). As a side note, DDM and Alway Encrypted won’t work together on the same column.

Now let’s get ready to play with Dynamic Data Masking in SQL Server.  (Coming next month)

Today’s song is Dirty Laundry by Carrie Underwood.

I won’t be late for this, late for that because I have Time Zone Info….

One of the new items in SQL Server 2016 is the super awesome time_zone_info table.  When I heard about it, I started to think about all the cool things that it could help me do.  First, let’s look at the table.

SELECT *
FROM [sys].[time_zone_info]

time_zone_info

Yes, it is 132 rows of magic! Now that we have this super cool table, how do we use it? Let’s pretend that my data is time-stamped in US Mountain Standard Time, but I want to display it in Western Australia Standard Time.  I would do it like this:

SELECT GETDATE() AS GETDATE_Time,
 GETDATE() AT TIME ZONE 'US Mountain Standard Time' AS Mountain_Time,
 GETDATE() AT TIME ZONE 'US Mountain Standard Time' 
   AT TIME ZONE 'W. Australia Standard Time'AS W_Aus_Time;

I am including the GetDate column so you can see that GetDate is using my time zone, but I have to tell it what time zone it is before I can convert it to another one.

time-zone-query

Caution: If I put in the Hawaiian time zone instead of Mountain time on the GetDate, SQL won’t correct me, it will just do the math like a good little system and assume I know what time zone I am using to start.

I am am really loving the new features in SQL 2016! I hope you are enjoying it too!

This posts song is Cleopatra by The Lumineers

Lay your weary head to rest and run your query more…

Just coming from a wonderful week at PASS Summit. I sat in two separate sessions where this trick came up and watched as people furiously wrote it down.  Did you know that you can set a query to run multiple times in one command?  All you have to do is add “Go” and the number of times you want it to run.  For example:

SELECT GETDATE()
GO 5

Will return something like this:

go5results

Super cool, right?  It was mentioned in both Brent Ozar’s and Argenis Fernandez’s presentations and I didn’t want to forget. Now you can easily run your queries more and create load on your test system without having to click run over and over again.

Today’s post features Lyrics from Panic! At the Disco’s Cover of Carry On My Wayward Son

Mayday this is an emergency, my linked server is using ODBC to connect to an AG…

Availability Groups (AG) and Linked servers can get really tricky. Especially if you are dealing with multi-subnet failover.  The only way we have figured out how to do this is with ODBC. Here is how.

First, we have create an ODBC connection on our SQL Server.  The single server in the picture below is the server we are going create the ODBC connection and the linked server on.  It will go over to the AG Listener. ag-pic

First we are creating an ODBC Connection on our server that is going to link to the AG.

odbc1

Make sure to be in the System DSN section. Click Add

odbc2

We can pick either ODBC Driver 11 or 13.  This is a separate driver install that we can get here.  We want to install the driver and then we will see it as an option in the screen above.  Click Finish.

odbc3

Give it whatever name and description wanted, but save the name for later. The server should be the name of the AG Listener. Click Next.

odbc4

Technically we don’t have to put in a login and password, but I like to test the login and password that I am going to use for the linked server. It won’t be saved here. Click Next.

odbc5

Here is the magic part, make sure to check multi-subnet failover.  That is what is going to make the connection automatically fail between the two nodes. Click next, test the connection and then Finish. The ODBC connection is ready to be used by the linked server connection.  Let’s build that part now.

Go into SQL Server Management Studio and under Server Objects, right click on Linked Servers and select “New Linked Server”.

odbc6

The provider needs to be OLE DB Provider for ODBC Drivers. Remember the name we gave the ODBC connection?  We are going to use that here. Then go to the Security Tab.

odbc7

This is where we put in the login and it will be stored here.  I also make sure this user name and password is on both Nodes of the AG with the permissions that I need. Click Server Options

odbc8

The above is what I need, but I check that I am only giving access to what is needed and not more.  When we click ok, it will test our connection.  If everything works with no errors, we are ready to go.

Some of the problems that we have noticed are querying tables that have big datatypes like time(3-7), timestamp, and a few others.  Casting or converting the datatypes doesn’t help. If we pull the table into a view without the big datatype columns, we are able to query the view from another server, but never the base table. It has been a bit frustrating, but we are still hopeful that we can find a solution or that Microsoft with fix ODBC connections. If there is a better way to do this, please reach out to me.  We have things we need to solve and could use some help.

The song for this post is Mayday by Cam.

Coming soon: Count down to PASS Summit 2016 with more pictures from PASS Summit 2015. Watch twitter and the Magic Mirrors page for more.

Nothing can stop me, nothing holds me back from changing recovery mode and getting development on track…

Greetings and other salutations,

Today I found out that part of the development environment was in “Full Recovery Mode”.  This means that if someone isn’t taking log backups, their databases get huge, and it also means that the backups were much bigger than they should have been.  They don’t need point in time recovery in our development environment so we decided to move them to “Simple recovery”. This could have been a big all day job if I went through the GUI, but you know me, I found a way to script it out and thought I would share it. I am showing you how to do it on one server at a time:

Connect to your development server in the master database and run this query to see how many are in “Full Recovery”:

 SELECT name, recovery_model_desc
 FROM sys.databases
 WHERE recovery_model_desc = 'FULL'

When I ran it on one of my servers, there were 24 databases that needed to be adjusted. So I built this:

 SELECT 'ALTER DATABASE [' + name + '] SET RECOVERY SIMPLE ;'
 FROM sys.databases
 WHERE recovery_model_desc = 'Full'

Then I took the results from that query and copied it into a new window and ran it and just like that, all my databases are now in “Simple Mode” in Development. I ran the first query one more time to make sure everything updated as expected.

It is a beautiful thing. I hope this helps you clean up development too!

The song from this post is from the Kongo’s Take it from Me

Hello Darkness my old friend, I can talk to you again because my Availability Group is quiet…

We have a lovely Availability Group that holds A LOT of data that is broken into partitions.  We have 42 partitions and they are usually moving information around daily between them.   The index rebuilds on them were making our logs HUGE because the the Availability Group was taking too long to catch up, we tried both Synchronous and Asynchronous mode.  We would see all kinds of errors.  We were doing horrible things like auto shrinking our transaction log after the indexing finished and  ignoring alarms during the time the database was rebuilding.  We had requested more and more space from our storage team and sometimes the job wouldn’t even finish because it ran out of space.  Our first idea was to split out the index rebuilds so that we could do one partition at a time.

It looks like this:


ALTER INDEX IndexName
ON [dbo].Table
REBUILD PARTITION = 42

By splitting this out, we were able to get the job to finish, but with tons of alarms, and log growth.

Then we had a thought, maybe the server is just spinning too fast and we need to give the Availability Group time to catch up.  So we added some simple waits in between each step.


WAITFOR DELAY '00:10';

As an example this is in minutes and will wait for 10 minutes before running the next step.


It has now been a quiet week and we are looking forward to the Sound of Silence.

If Crazy = Genius, I’m rebuilding one partition at a time!

We have had an index job that has been failing for a while.  This is one of those things you really don’t want to clean up because no one is complaining, but you know you should.  I had heard that I could rebuild one partition at a time, but where to start?  Today, I worked my way through it, so here it is so that you can do it too.

First you need to find the biggest indexes, there is a good chance those are the ones that live on partitions. I am removing Primary Keys.


SELECT i.[name] AS IndexName
,SUM(ps.[used_page_count]) * 8 AS IndexSizeKB
FROM sys.dm_db_partition_stats AS ps
INNER JOIN sys.indexes AS i ON ps.[object_id] = i.[object_id]
AND ps.[index_id] = i.[index_id]
WHERE i.name NOT LIKE 'PK%'
GROUP BY i.[name]
ORDER BY IndexSizeKB DESC

The top ones are most likely the ones you want to focus on.  Next, we need to track down the partition function.


SELECT * FROM sys.partition_functions

Next we are going to figure out which partition we want to rebuild.


SELECT sprv.value AS [Value], sprv.boundary_id AS [ID]
FROM sys.partition_functions AS spf
INNER JOIN sys.partition_range_values sprv ON sprv.function_id = spf.function_id
WHERE (spf.name = N'NameOfFunctionFromPartitionFunctions')
ORDER BY [ID] ASC

Pick the number of the partition you want to rebuild.

Next use your index name from earlier.  You will also need the table name and the partition number.


ALTER INDEX [IndexName]
ON [dbo].[TableName]
REBUILD PARTITION = 3

This will rebuild just the partition that you requested.